Azure API for FHIR (Part 1), Set Up and Configure

I recently was asked by a good friend of mine, who owns a healthcare technology startup, to stand up an FHIR server in Azure and train a few developers on how to query it. This ask was part of a more extensive architecture.
FHIR Background
Interoperability has plagued the healthcare industry for decades. Patients have very little access to their health data, and healthcare providers find it extremely difficult to share patient data. To help solve this dilemma, Health Level Seven International (HL7) created the Fast Healthcare Interoperability Resources (FHIR), pronounced “fire.” The initial draft was published in August 2011, with release two occurring in October 2015. The healthcare community is now working with release four, and this release is considered the first normative version.
FHIR is organized by resources, such as Patient, Organization, Observation, Care Team, etc. You can alter the behavior of these resources by defining profiles. FHIR is implemented over HTTPS protocol, making it extremely easy to create CRUD operations. Now organizations can gather real-time data from several sources, where the data can go through further enrichment and analysis before storage. One could also use A.I. and Machine Learning services on non-identifiable subsets of this data.
Azure Cloud
Microsoft has invested heavily in the healthcare technology space. At the time of this writing, Microsoft announced Nuance’s purchase, which will further its healthcare providers’ efforts. While pursuing larger health enterprises with their product “Microsoft Cloud for Healthcare,” they have provided developers with two solutions. These two solutions allow us to operate our own FHIR server as well as use their managed resource. For this architecture request, I chose to use the managed solution “Azure API for FHIR.” I believe you should always keep it as simple as possible, even with larger systems. Remember, the more complex you design something, the harder it is to ultimately code it, maintain it, and find and eliminate bugs. Plus, Azure cloud design principle seven, “use managed services,” is one of the biggest to live by.
Azure API for FHIR provisions a fully managed and enterprise-grade FHIR service in minutes while incapsulating the HTTPS API layer, security, and database layer into one global component in your Azure subscription. You can’t get any simpler than that. Ok, so let’s set this puppy up.
Managed Service
Open the portal and select or create the resource group you wish to place the resource. Click the “Add” button within the resource group. In the “search the marketplace” entry, type “fhir” and select the option “Azure API for FHIR,” then click “Create.”
The “Create Azure API for FHIR” blade presents you with several options. Provide an account name, location and select FHIR Version R4. At the time of this writing, R4 is the latest release. Your blade should look something like this.

We will skip over the networking tab, but you would do so there if you need to specify a private endpoint. The additional settings tab presents you with authentication choices. Authority and Audience entries are auto-filled in for you. This resource uses Azure Cosmos DB as it’s data store so you have a choice on your provisioned throughput. The default value is 400 RU’s. This value is editable later. Cosmos DB is one of the best managed and distributed databases around, so your data is in good hands. The rest of the settings we leave at their defaults. You can review and create. However, before you do, I recommend you giving it one or more tags. It is a good practice to tag your Azure resources so that you can easily find them later. Trust me; when you have hundreds of resources in a single subscription, tagging is a lifesaver.
Once created, you will have a resource in your group that has a heart icon. Let’s test to make sure our FHIR server runs by doing a browser fetch to URI https://<account-name>.azurehealthcareapis.com/metadata. Replace <account-name> with the one you have chosen. Doing the browser fetch, you should see the capability statement.
Configuration
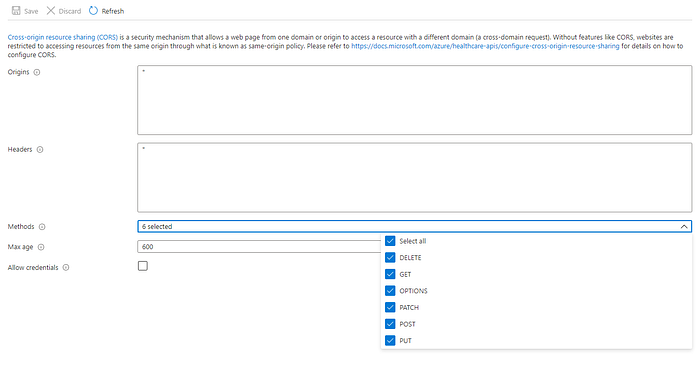
Microsoft provides some decent documentation to configure access, but it can become confusing. I will try to simplify it here. The first place you want to head to is the “CORS” section. Place a * in the “Origins” and “Headers” entries. Select all methods and provide a 600 for “max age.” Save those settings.
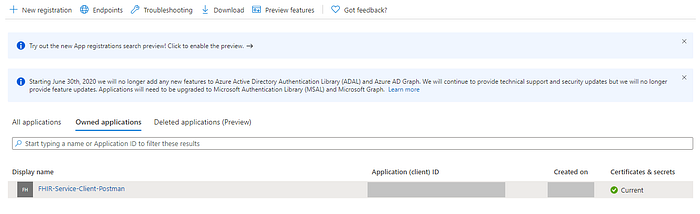
Now we need to register a client application. Open the Azure Active Directory blade and select App registrations from the left menu. Click “New registration” button and enter in a name. I left the default for supported account types. In the redirect URI area, select “Public client/native (mobile & desktop) from the drop-down and enter https://www.getpostman.com/oauth2/callback in the entry field, then click Register. Once the registration is created, you should see it in the list.
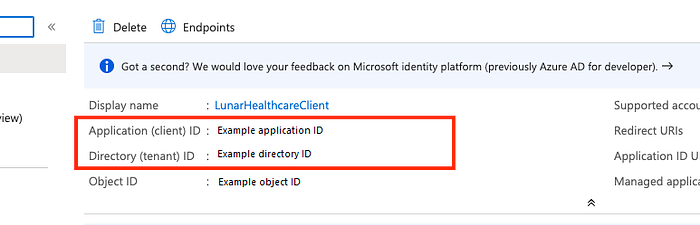
You will want to copy the client and tenant Id’s
Next, we add API permissions. Inside your new app registration blade, click on the “API permissions” item in the left menu. Click the “Add a permission” button and type “Azure Healthcare” into the search entry.
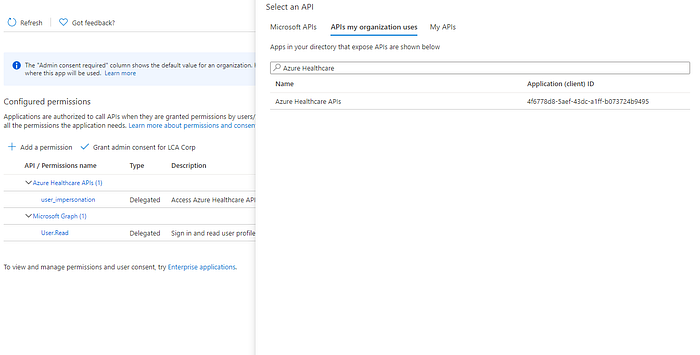
Click the “Add permissions” button.
The last thing we need to do is create a client secret. Click “Certificates & secrets” in the left menu and click the “New client secret” button. Enter in a description and expiration date, then click “Add.” You are presented with your secret. Note, you must copy it now as it is not displayed anytime after closing the blade. Seriously, COPY IT NOW!
UPDATE 7/29/2021: I noticed I failed to provide one additional step for access. Enter your Azure API for FHIR service within the portal. Click on “Access control (IAM)” link in the left menu. You will need to add control to this service for your app registration. Click “Add” and select “Add role assignment”. Select the appropriate role (FHIR Data Contributor, etc.) and search for your app registration by name, select and click “Save”.
Now our registration has permissions. Naturally, we will want to test CRUD operations using a client like Postman. I had a hard time getting this to work as the documentation seems incorrect, and a google search wasn’t helpful. It took me a few hours, but I finally figured it out. Hopefully, this saves you my headache.
Open a new post request in Postman. We will use this to obtain an access token. Enter in this address https://login.microsoftonline.com/<tenant-id>/oauth2/token, replacing <tenant-id> with yours. In the body of our post, we want to select “x-www-form-urlencoded” as the body type. Here is the key. We need to provide four key/value pairs that Postman will send. These four values are “grant_type”, “client_id”, “client_secret”, and “resource”. In grant_type, provide the value “client_credentials” without the double-quotes. Provided your application Id as the client_id value. Provide the client secret value for the client_secret. Lastly, provide your Azure API for FHIR URI as the resource value. That’s it!
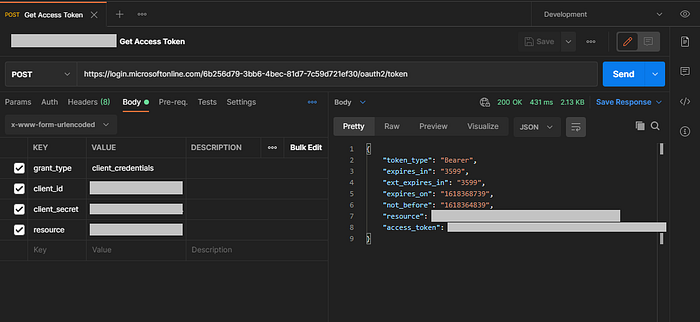
Sending the request should result in a JSON response that contains the access token and token expiration date and time.
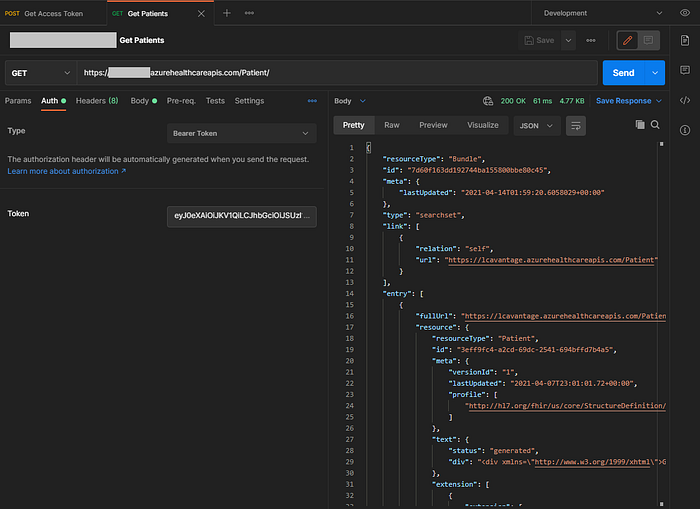
You can now use that token in other requests using Postman. Assuming we already had patients in the data store, we could direct Postman to retrieve them using a URI like https://<account-name>.azurehealthcareapis.com/Patient/.
Summary
In this part, we successfully set up and configured Azure API for FHIR resource and queried it using Postman.
In part 2, I will show you how to perform CRUD operations using C# from an Azure Function.
